Stamping in the Rain

Showing posts with label Framelits. Show all posts

Friday, December 25, 2015

Cup of Cheer

Merry Christmas, Friends!
Santa's On His Way!  The Cup of Cheer stamp set and the Lots of Labels Framelits are the perfect place for Santa to hang out!  He is hand trimmed from the Home for Christmas DSP...love this paper!  Two Rhinestones (colored with a Real Red Stampin' Marker!) add some sparkle!

This pretty card is perfect for a Friendship note or even a Get Well card.  Some Dazzling Diamonds in your cup (haha!) and Glimmer Paper behind glams things up a bit.  A delicate Doily and the Decorative Dots Embossing Folder create a soft background.

And it is Christmas Day!  The new Elegant Dots Embossing Folder adds a pretty texture to this card, which is blinged up a bit with some Dazzling Details around the 'wreath.'

I have one more set to share with you later today.  I hope you all have a wonderful Christmas Day!

Wednesday, December 23, 2015

Peaceful Pines

Such an easy, yet beautiful card.  The background uses the Stylish Stripes Embossing Folder, layered with cardstock rectangles and a punched circle from the Merry Moments DSP.  A pretty tree is stamped twice, once in Old Olive and again in White Craft Ink, then raised on Dimensionals.  Dazzling Details adds a glittery snowy look.  The sentiment is framed by the Decorative Label Punch.

This card is super simple.  Just a few strips of cardstock and paper from the Merry Moments DSP stack, add a stamped tree, cut it out with the Perfect Pines Framelits Dies, add a sentiment and a Rhinestone and you're done!

This is such a pretty technique!  Punch out a tree using the Perfect Pines Framelits Dies, then layer a sheet from the Season of Cheer Designer Series Paper behind it.  Punch out the tree stand from Night of Navy cardstock, stamp some snowflakes and add a Silver Foil star to the top of the tree!  Silver Cording lies behind the sentiment, which is also punched out using the Decorative Label Punch.

Peaceful Wreath

This pretty wreath is hand colored with Cherry Cobbler and Old Olive Stampin' Markers and cut out with the Wonderful Wreath Framelits.  The background uses the Hardwood stamp on top of the Woodgrain Embossing Folder, one of my favorites!  I could see this card being used for a masculine Birthday or Father's Day card, if you just switched out the sentiment (which is from the Christmas Greetings Thinlits Dies)

I love this simple card!  I think if you attached the tag with a removable glue dot, it could be a Bookmark!  The pretty Holly leaves are stamped in Garden Green ink, while the berries are hand colored with a Real Red Stampin' Marker.  The background is embossed with the pretty Boughs & Berries Textured Impressions Embossing Folder.

Loving this color!  The Brick Wall Embossing Folder provides a pretty background for the hand colored holly and berries.  Gold Glitter Ribbon peeks out from behind the Peace sentiment, also from the Peaceful Wreath stamp set.  The edges of the Very Vanilla Paper are sponged with the same pretty Hello Honey Stampin' Ink.

Tuesday, December 22, 2015

To You & Yours, Too!


This stamp set has a little bit of everything!  A pretty background stamp (trees with a deer) that fits perfectly in the 'window' of the Hearth & Home Thinlits Dies, a couple of pretty sentiments, an ornament hanger! and a pretty tree (coming up in the next card below)

The bow is punched out of Silver Glimmer paper, using the Wonderful Wreaths Framelits Dies and the Softly Falling Textured Impressions Embossing Folder provides some texture for the background.


Here is a really easy card to make if you have the pretty Christmas Greetings Thinlit Dies...the Red Glimmer Paper really shines on this card.  Punch out the star with the star from the Itty Bitty Accents Punch Pack.

Another quick card that uses the gorgeous Joy from the Wonderful Wreath Framelits Dies punched out of Silver Glimmer Paper.  The Softly Falling Embossing Folder is used (upside down!) and the sentiment is stamped on cardstock, then punched out with the cute new Curvy Corner Trio Punch.  Such a fun way to use all of our new tools and supplies!

Hope you're enjoying these ideas as you are crafting your way through Christmas!

Sunday, December 20, 2015

Your Presents

A quick and easy card that uses the Your Presents stamp set, but would be just as easy to make on your own with DSP or even solid color cardstock and some ribbon or Gold Cording.  The Brick Wall Embossing Folder provides a cute background and the Jolly framelit comes from the Christmas Greetings Thinlits collection.  Fun and quick!

Another simple card created with the Your Presents stamp set and the Red Striped ribbon, along with the Gold Cording.  A strip of Gold Foil adds elegance.  The sentiment is stamped in Gold ink and the Real Red cardstock is punched out with the Scallop Oval punch, one of my favorite punches.

Here's a way to use the same stamp set for a Thank You or Birthday card.  The gift bag uses a Doily and Gold Cording and the background is embossed with the Large Polka Dot Embossing Folder.  The sentiment is stamped in Whisper White Craft Ink (give it a few hours to dry!) and hand cut.

I hope you're having fun this weekend preparing for Christmas festivities next week.  We made gingerbread houses this afternoon!  So fun.

Saturday, December 19, 2015

Jingle All the Way!

Here is a cute set of cards that uses the Jingle All the Way stamp set, which comes bundled along with the Sleigh Ride Edgelits Dies.  These edgelits are really neat and easy to use with your Big Shot.  This card uses the Circle Framelits to create a circle behind which the town and moon can be seen.  Silver Glimmer Paper stars are punched from the Confetti Stars Border Punch.  Pretty White Glitter Ribbon and Silver Cording add extra bling!

This card uses the famous (and hard to find!) Woodland Textured Impressions Embossing Folder to create beautiful birch trees.  Use a sponge with just a tad of Basic Grey Ink to lightly shade the trees after embossing.  Silver Cording is used to make a bow next to the Jingle All the Way sentiment.  The sleigh is punched out of Real Red and Basic Black cardstock, using the Sleigh Ride Edgelit Dies,  to create a shadow effect.

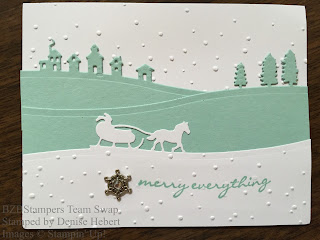
The background of this card is created with the pretty Softly Falling Textured Impressions Embossing Folder to give the look of snow.  All three of the Sleigh Ride Edgelits are used in this card, as they form the hills and valleys in this snowy town.  The sentiment is stamped before embossing and the sparkly Winter Wonderland Embellishment is attached with a glue dot or two.

I love using the Big Shot to create cards.  It makes a beautiful card quick and easy and it turns out looking very professional.  I hope these cards give you some inspiration this weekend!

Monday, November 2, 2015

Grateful for Thanksgiving

Here are a few Thanksgiving cards to inspire you this season.
Thanksgiving is one of my favorite holidays.  I love this Thankful Forest Friends stamp set.  It coordinates so well with the Into the Woods Designer Series Paper.  This card adds a little Gold Glimmer paper behind the Mossy Meadow, which is embossed with the Woodgrain Embossing Folder.  A wooden leaf from the Into the Woods Elements set finishes it off.

This elegant card uses the pretty Gold Foil sheets, which are cut out with the Ovals Collection Framelits.  The strip behind the ovals is Black Glimmer paper and the sentiment (from the Thankful Forest Friends set) is embossed with Black Embossing Powder.  The Very Vanilla background is embossed using the new Elegant Dots Embossing Folder.  The bow is tied with the Gold Cording Trim from the new Holiday Mini catalog.

This pretty card uses the same stamp set and DSP as the other two cards, but also uses the Lots of Labels Framelits to cut out the sentiment.  The Rich Razzleberry bow is tied with the new Into the Woods Ribbon from the Holiday Mini Catalog.

I hope you enjoyed these cards and got some ideas for your own Thanksgiving cards this year.  Happy Thanksgiving!

Tuesday, October 27, 2015

A Halloween Treat Holder!

This cute new Pillow Box thinlit die makes a great Halloween Treat Holder!
This little Owl is from the Howl-o-ween Treat stamp set and is punched out with the matching Boo to You Framelits Die.  I love how a little bit of a Spider Web Doily peeks out from under him!  The DSP is the Happy Haunting Designer Series Paper.

The little guy's eyes are made out of Silver Glimmer paper and a Pearl Jewel colored with black marker.  A thin strip of Black Glimmer paper finishes this Treat holder off!

Happy Halloween!

Wednesday, October 7, 2015

Howl-o-ween Treat! (and a bit of Christmas, too!)

This set of cute cards uses the Howl-o-ween Stamp Set, as well as some fun accessories found in the new Holiday Mini Catalog.
This spooky card has the sentiment embossed on some Vellum Paper and cut out by hand to give it a kind of "floating" look.  The skeleton is also embossed with Basic Black Embossing Powder.  Black Glimmer Paper adds a few highlights!  I just love the look of those Spider Web Doilies on top of the Happy Haunting Designer Series Paper.  The cute bow comes from the Handpicked Framelits set!

This is one of my favorites!  The Boo! comes from the Boo to You Framelits Dies set and the spiders are embossed with Gold Embossing Powder on some White Vellum paper.  The Boo! is cut out twice; once from Gold Foil paper and again from White Vellum paper, to give a shadow effect.  The Happy Haunting Designer Series Paper stands out with a bit of Tangelo Twist paper behind it.  Wouldn't this make a cute candy bar wrapper?

This is the very creatively Christmas version of this stamp set.  Our cute little owl transforms into Santa Penguin!  The Witch's hat becomes a Santa hat and the scary skeleton head turns into Santa's sack!  How cute is that?

The snowy background is created with a couple of strips of torn Whisper White cardstock and the background is Smoky Slate card stock embossed with the Softly Falling Textured Impressions Embossing Folder.  The raised dots are highlighted with a touch of the White uni-ball Signo Gel Pen.  Merry Christmas!

Sunday, September 27, 2015

Witches' Night!

Today, I'm going to share a few more spooky Halloween cards.  This is a very cute set, which can be fun or scary, depending on how you accessorize it.

I love the colors on this card and the little bats flying up from the spooky sign.  A touch of Black Glimmer paper adds a cool highlight!

Here's another one that uses that cute Happy Haunting Designer Series Paper, as well as a strip of Black Glimmer paper.  This one's a bit spookier!

Here's the scary version of this set!  Rich Razzleberry is sponged over the spider webs and Old Olive gives the raven a spooky look!  A strip of Rich Razzleberry, embossed with the Chevron Embossing Folder adds a nice touch, along with a soft highlighting of gold ink daubed here and there.

The really neat thing about this whole set is that you don't have to cut the signs out...there's a Framelit set for them...the Lots of Labels Framelits Dies.  Happy Halloween!